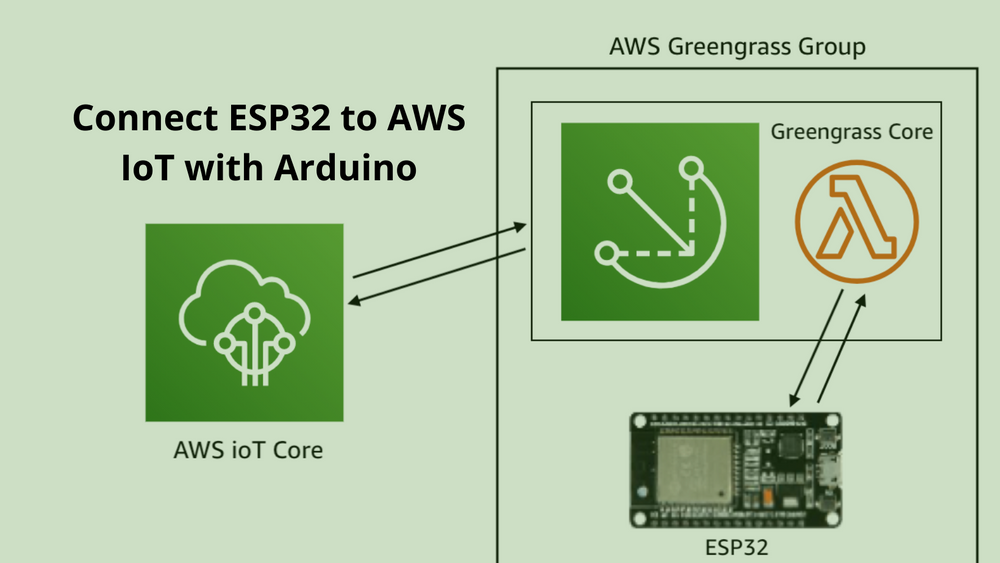
Connect ESP32 to AWS IoT with Arduino
Hello People. This article discusses how to connect ESP32 to AWS IoT with Arduino. ESP32 is a powerful micro-controller and has built-in WiFi. You can connect it to AWS IoT to send sensor data to the cloud for processing.
Firstly, we need to write some code to connect ESP32 to a WiFi network. We need to also define wifi credentials. Then we can write a simple function that tries to connect to the given network.
Creating a certificate
Next step is registering your device with AWS and creating a certificate for it. Amazon’s IoT service is secure by default and requires each device to have a unique certificate. Log into the AWS console and navigate to the IoT Core console. Go to "Manage > Things" and click on the "Create" button. Click on "Create a single thing".
Give your device a name and give it a type and attach it to a group. Next we have to generate a certificate for our device so it can communicate with AWS in a secure manner. Click on "One-click certificate creation".
Amazon will now generate certificates for your device. Download each one and also download the "root CA for AWS IoT". Also click on the "Activate" button. Next step is attaching a policy to the device. This policy will define what a device is allowed to do.
The policy allows devices to publish to MQTT topics that begin with their name and allows them to update their shadow document. It also checks if the device is connecting with a certificate that is attached to it. If not, the connection is refused. After the policy is added, click on "Register Thing" to finish the enrolment process.
Write down the URL of your MQTT endpoint. In the AWS IoT console, click on "Settings" in the bottom left corner. You’ll see your unique endpoint on the right.

Adding the certificates
We can add the certificates to our Arduino sketch. We will define three variables to store Amazon’s root CA AWS_CERT_CA, the private key of our device AWS_CERT_PRIVATE and the certificate of our device AWS_CERT_CRT. The public key that Amazon generated for our device is not needed.
Are you looking to start your business in the electric vehicle industry? We provide software development, web application development, mobile application development, charging stations management app, electric vehicle fleet management software development, cyber security and all software services. Please check our home page here https://iwheels.co/

Ok. Let's get back to the article.
Connect to AWS IOT via MQTT
After adding the certificates, we can now connect to AWS via MQTT. We should define configuration variables in the main sketch file. We also need to install an MQTT library. Next, we can create two instances. WiFiClientSecure which will be responsible for handling the encryption with our certificates and MQTTClient which will actually speak MQTT protocol with AWS. Now we’re ready to establish our MQTT connection with AWS. At this point, we should have an open connection with AWS ready to send or receive messages.
Sending JSON data with ArduinoJson
The final step is to use our MQTT connection to send some data to AWS. The most common way of doing this is by updating the device’s "Shadow document". This is a special feature that AWS designed with IoT devices in mind.
Hope this article on how to connect ESP32 to AWS IoT with Arduino is useful to you. Please read How to send data from device to AWS IoT