Storing sensor data into Dynamo DB from AWS IoT control panel
Hello People. This article discusses about storing sensor data into Dynamo DB from AWS IoT control panel. DynamoDB is a hosted NoSQL database offered by Amazon Web Services (AWS).
DynamoDB is a good fit for the following use cases:
Applications with large amounts of data
As your amount of data scales, JOINs and advanced SQL operations can slow down your queries. With DynamoDB, your queries have predictable latency up to any size, including over 100 TBs!
Serverless applications using AWS Lambda
AWS Lambda provides auto-scaling, stateless, ephemeral compute in response to event triggers. DynamoDB is accessible via an HTTP API and performs authentication & authorization via IAM roles, making it a perfect fit for building Serverless applications.
Data sets with simple, known access patterns
If you are generating recommendations and serving them to users, DynamoDB's simple key-value access patterns make it a fast, reliable choice.
Let us suppose you are doing a project to read some physical values using some sensors. You can send the sensor data to cloud like AWS DynamoDB.
Let us look at an example project where we do the following things.
- Read the Temperature in NodeMCU using a temperature Sensor (LM35 in this example)
- Form the JSON message with time stamp, that needs to be sent
- Send Data to AWS IoT
- From AWS IoT, send data to AWS DynamoDB
Explanation
In this project, we are using LM35 to read the temperature. LM35 gives an analog output of 10mV/°C. So we will supply the LM35 with power and read the output pin(Vout) in the ADC input of nodeMCU, i.e., pin A0.
Circuit to connect LM35 with NodeMCU
| NodeMCU | LM35 |
| Vin | 1 |
| GND | 3 |
| A0 | 2 |

The Code:
The code to convert the voltage value to temperature in can be found on Github pages.
Are you looking to start your business in the electric vehicle industry? We provide software development, web application development, mobile application development, charging stations management app, electric vehicle fleet management software development, cyber security and all software services. Please check our home page here https://iwheels.co/
Ok. Let's get back to the article.
Form the Message to send the Sensor Data to Cloud
We have read the temperature in the NodeMCU. Although we can send it directly to cloud, it won’t be very meaningful. Instead we will time stamp out readings and then send it. We need to write a code to form the message which we want to transmit. Once the code is ready, flash it on the NodeMCU.
AWS IoT Rule for DynamoDB:
At this point, you should get the message which was created in the previous step in AWS IoT core. You are now ready to move on to the rules.
The steps involved are very simple but they are quite a few in number. Below are those steps.
Steps to create AWS IoT Rule for DynamoDB:
- In the left hand navigation in AWS IoT Core, go to Act>Rules
- In the page that Opens, click Create
- Add a name for the rule and scroll down
- In the “Rule query statement” section, add the following statement:
SELECT Temperature FROM 'terraceTemp' WHERE Temperature>0
- The next section is “Set one or more actions“. Click on “Add Action“
- From the actions that are presented, select “Insert a message into a DynamoDB table” > Configure Action
- You will now need to configure the table to which you want to write the data. For the sake of this post, I will assume that you do not have any table for this data. So, click on “Create a new resource“. This will take you to DynamoDB
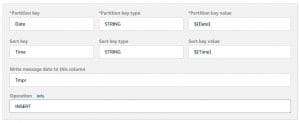
- Enter a table name, Partition key = “Date” and Sort key = “Time” without the double quotes
- Click on create and wait for the table to be created
- Go back to the AWS IoT page where you were creating the rule and click on refresh just before the
- “Create a new resource” option
- Now, select the table which you just created from drop down
- In “Partition key value“, enter ${Date}
- “Sort key value“= ${Time}
- In write message to this column, give a name of the column into which you want to write the data. I gave it “Tmpr“
- Operation = “INSERT“
- Scroll down and click on “Create Role“
- After the role is created, click on “Add Action“
Verify the Rule
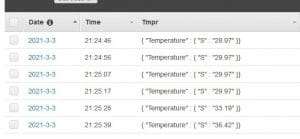
Now, the next message received by AWS IoT core in the defined format will be pushed to Dynamo DB. Open the table which you had created and go to “Items“. You should see your data that looks similar to this
You are now successfully able to send your sensor data to the cloud.
Hope this article about Storing sensor data into Dynamo DB from AWS IoT control panel is useful to you. Please read about Tata power EV charging stations in Andhra Pradesh